Gateway/NV54/innards/reassembly
Jump to navigation
Jump to search
About
These were the steps I finally used to reassemble a Gateway NV54 laptop. Reassembly began on 2010-08-27, was complete on 2010-08-31, and took about 5 hours due largely to uncertainty about the cable brackets.
Steps
- place system board in bottom part of case
- attach 1 back screw (top left -- seems slightly smaller than others)
- there were 2 "slightly smaller" screws left over at the end -- maybe these should have been used at this point
- re-attach small subboard at lower right (1 screw only : lower left)
- insert DVD drive (comes in from outside of case)
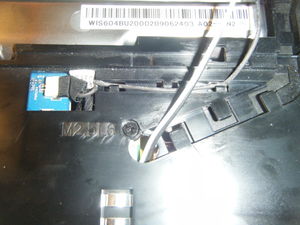
- re-attach USBCN1 connector (see photo)
- route black and white wire pair so ends poke out near where they will be plugged in (but don't bother plugging in yet)
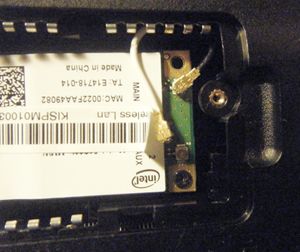
- these attach to the wireless network card (look for "MAC ID")
- I suspect they are the antenna for the wireless
- reattach the wider of the two ribbon cables labeled "MB" to the socket labeled "MMB1" on the system board
- lower the keyboard tray and snap it into place
- plug the black wire into PWRCN1 (see photo)
- socket is keyed, can't be plugged in the wrong way
- plug in video cables (1 wide, 1 single black wire)
- reconnect narrower "MB" ribbon cable (goes to touchpad)
- I had serious difficulty with this one because the retaining bracket apparently got broken during disassembly, but was able to get it to work somewhat erratically
- reattach display assembly (2 screws, attaching hinges to base)
- route video cables (1 thick, 1 single-wire)
- reattach keyboard ribbon cable
- this was the only ribbon cable with the separate-bracket-style connector that I was able to reattach with some semblance of correctness
- lower the keyboard into the keyboard tray
- clicks into place at top left & right, with not much pressure
- top middle remains somewhat bowed out -- this can be fixed after indicator panel is in place
- reinstall indicator panel
- snap top of keyboard into place (about 3 snap-points)
- turn laptop upside down
- reattach black & white wires to WLAN card (see photo)
- put screws back in everywhere, not forgetting:
- 2 inside battery compartment
- 2 odd-looking silver screws which seem to belong to the hard drive caddy
- up to 5 slightly smaller black screws which go in the Z-shaped HD/plugins cover (some screws may still be in their holes in the cover)
- note for disassembly: keep these screws separate next time
I had 1 leftover regular-sized screw and 1 mini-sized; came up short 2 regular screws, but these were probably missing before I got the unit. Mini-sized screws might belong on system board -- look for any additional arrows I might have missed, next time this model gets disassembled.


